Brow Mastery: Shape, Fill, and Set Like a Pro
Master every step of brow grooming—from mapping and shaping to precise filling and budge-proof setting—for brows that frame, flatter, and last.
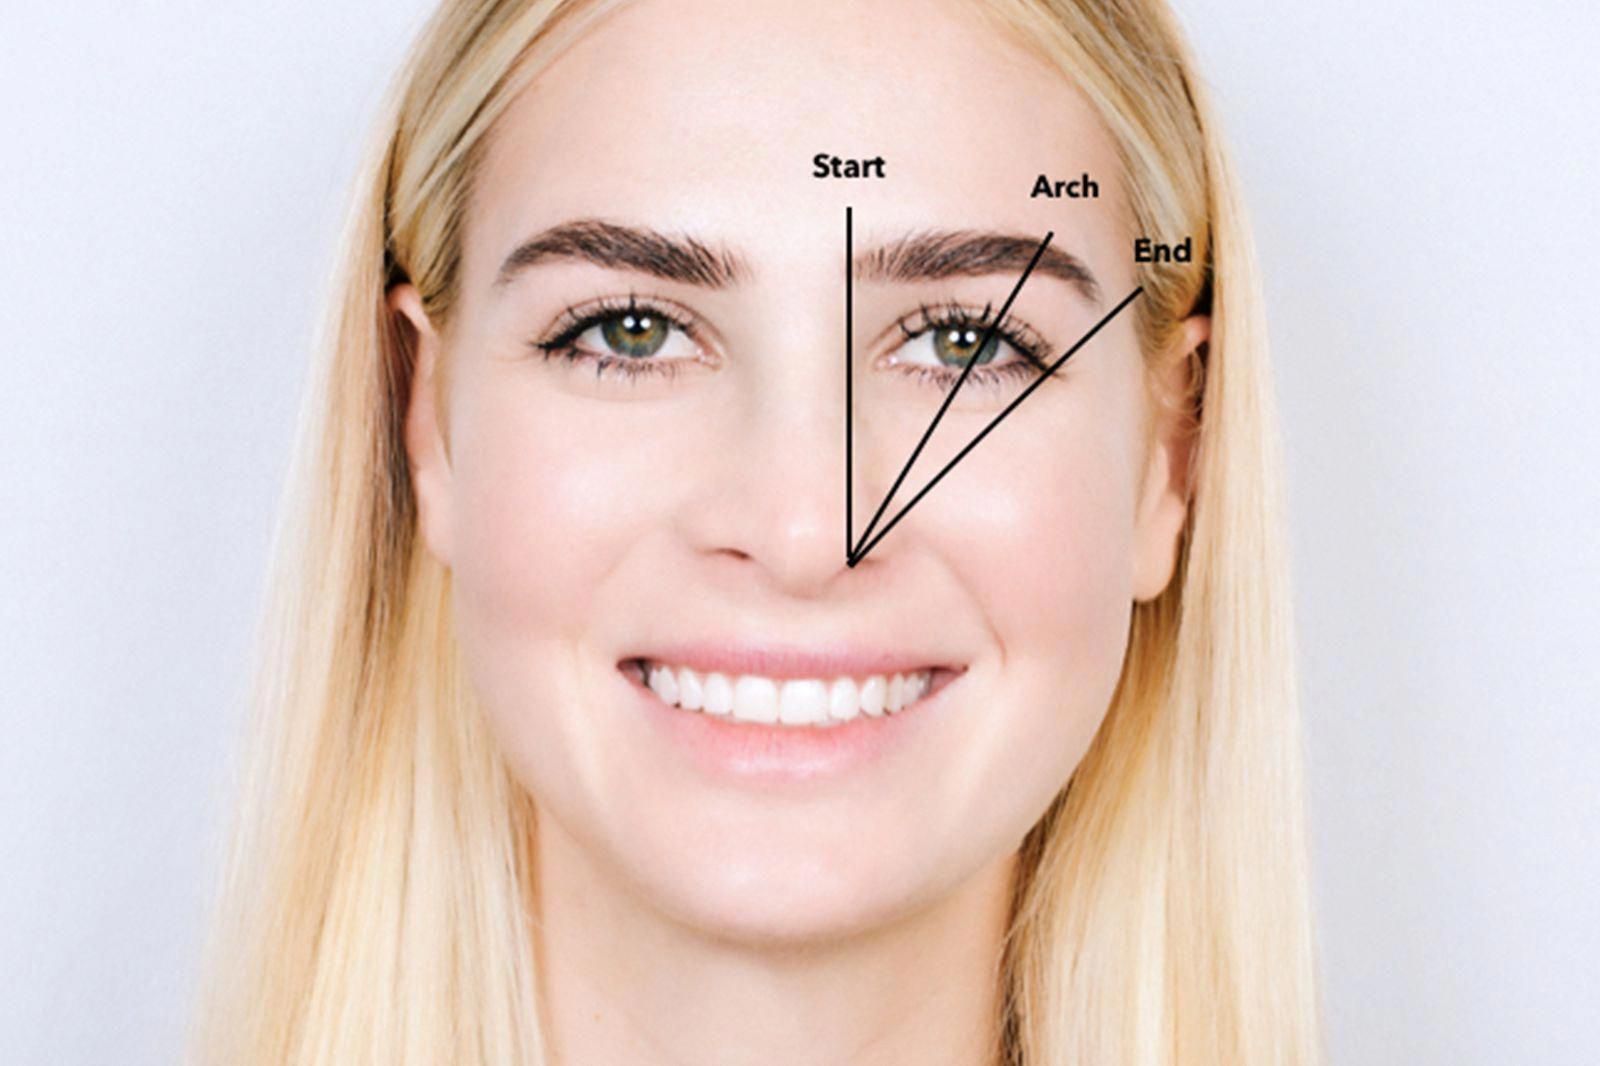
Map and Respect Your Shape
Great brows begin with a plan. Map the head, arch, and tail to honor your natural growth and face balance. Hold a pencil vertically from the side of your nose to find where the brow should start, angle it through the pupil for the highest arch, and angle it to the outer corner of the eye to locate the tail. Notice the head is softer and lighter, the middle carries most density, and the tail tapers to a clean finish. Brush hairs upward with a spoolie to reveal the true outline, then observe asymmetries; most faces are cousins, not twins, so aim for harmony, not identical clones. Consider face shape and features: a gentle arch can soften strong angles, while a slightly higher arch can lift and open smaller eyes. Respect the natural brow line and bone structure to avoid overcorrecting. When in doubt, remove less, sketch your plan, and let subtlety lead every decision.
Choose Tools and Technique
The right tools turn careful ideas into crisp results. Invest in precision tweezers with a sharp slant, small brow scissors, a clean spoolie, and optional brow razors for peach-fuzz along the perimeter. Good lighting and a steady mirror at eye level prevent over-tweezing, while warm skin after a shower makes hairs release more easily. Brush hairs up, trim only the longest tips, and tweeze one hair at a time in the direction of growth to protect the follicle. Keep sanitation a priority by wiping tools with alcohol and washing hands before and after. If you choose threading or waxing, define a conservative boundary with a pencil first and avoid removing from the top line excessively to preserve the brow's lift. Soothe the area with a gentle aloe or fragrance-free gel. Take breaks to assess both sides, remembering that minimal, strategic shaping preserves fullness and keeps room for graceful adjustments later.
Fill With Precision
Filling brows should enhance texture, not mask it. Choose a product format that matches your goals: pencil for control, powder for softness, pomade for structure, and micro-tip pens to draw hair-like strokes. Start by sketching a faint baseline beneath the brow to define shape, then use light micro-strokes following natural growth. Create a gradient from front to tail: keep the head sheer and airy, concentrate color mid-brow, and refine the tail with precise definition. Select a shade that mirrors your brow hair, not your scalp; aim for neutral or slightly cool tones on ash hair, and gently warm tones on golden or red hair. Comb through with a spoolie after every few strokes to diffuse edges. To thicken sparse patches, layer powder over pencil for convincing dimension. Avoid hard boxes at the front; instead, tap product onto the skin with a small angled brush, letting the natural skin peek through for believable lift.
Set For All-Day Hold
Setting locks in your work and adds texture. Use clear gel when shape is perfect, or a tinted gel with micro fibers to add instant volume. For a lifted, fluffy effect, backcomb gently from tail to head, then smooth hairs upward and outward in their final direction. Tap the front vertically to create a soft feathered rise, and angle the tail slightly upward for a subtle eye lift. If you love a laminating vibe, choose a flexible-hold formula that dries without crunch, and press the hairs flat with the back of your brush to seal. In humid or active conditions, layer a long-wear, water-resistant gel over pencil to prevent fading. Oily skin benefits from a light brow primer or a touch of translucent powder along the perimeter before gel to reduce slip. Let products set fully before touching to preserve definition, and resist over-brushing which can disturb your placement.
Tailor to Your Features
Pro-level brows are personalized. For delicate features, a soft arch and medium thickness keep proportions balanced. Strong bone structure often shines with a slightly lifted arch and a crisp tail that elongates the eye. If your brows are naturally dense, use a tiny amount of tinted gel to tame and define without adding heaviness; for sparse brows, lean on micro-strokes and subtle powder veils for believable fullness. Glasses wearers can echo the frame shape: a clean, structured brow complements bold frames, while a softer brow pairs nicely with thin or round frames. For very fair hair, choose a shade one step deeper than the roots for definition without stark contrast; for deep hair, go one to two steps softer to avoid severity. On mature skin, favor creamy pencils and gentle gels that do not tug. For a naturally groomed masculine look, emphasize density and tidiness while keeping the front diffused and the arch understated.
Maintain and Troubleshoot
Brow success is a routine. Commit to maintenance rather than constant tweaking. Set a schedule to trim and tweeze only obvious outliers, avoiding daily over-editing that thins density over time. Encourage regrowth with patience, gentle cleansing, and light conditioning using simple, non-irritating oils; the goal is to support the skin, not promise miracles. If you over-tweeze, stop removing hairs for a while and rely on pencil and powder to rebuild shape as new growth returns. When color looks too dark, soften with spoolie blending or a veil of translucent powder. If the front appears squared, erase the inner line with a cotton swab and reapply wispy micro-strokes. Keep tools sanitized, replace dull tweezers, and avoid sharing products. For busy mornings, adopt a two-step routine: quick pencil strokes for structure, then clear gel to set. Consistency and restraint preserve fullness, protect the hairline, and keep your brows camera-ready every day.